Integrations
How Summit works with the rest of the web.
Integrations run two ways. Let's look at both directions.
Fetching data from elsewhere
Fetching data from an external service depends on making the right kind of request to that external service.
This is covered in detail on our Requests page.
Calling Summit from elsewhere
Once you set a model live, you can call (or trigger) that model from anywhere that allows HTTP requests, from backend code to front-end frameworks to your favorite automation platforms like Zapier, Make, and HubSpot.
By HTTP Request
When you publish a model, Summit deploys an endpoint for you and provisions a default API key to secure that endpoint. You can read more about our Model API in our API reference.
Because your model has been deployed as a standard endpoint, it can be triggered (called) from any environment (tool or platform) that allows you to make an HTTP request.
Depending on the platform, these requests will be referred to by a variety of names and labels, such as "Custom Requests", "Requests", or "Sending & Receiving Data". Googling for "[your platform] + http requests" is a good way to find out.
HTTP requests can be synchronous: they wait for your model to finish and return data, or asynchronous (async): they don't. If you'd like to call your model async, you'll need to use our async compatible endpoint found on your models' API & Webhook page.
Example call to run your model and return its JSON output, passing input to its pre-defined parameters:
curl -X POST https://api.usesummit.com/beta/summit-hq/demo123/stripe-history-summary/data \
-H "X-Api-Key: 04a10e01cee8be8b1099" \
-H "Content-Type: application/json" \
-d '{"parameters": {"email": "[email protected]"}}'
Need an API key?
Create and manage API keys by visiting your Account Settings > API keys screen in Summit.
By Browser
If your model returns HTML, you can view those contents by visiting the HTML page provided on your API & Webhooks screen.

Sharing safety and security
This URL to view the HTML response of your model requires an API key to visit, and while we've provided a convenient Test URL, you should not share this with anyone directly. Instead, for sharing, its best to create a separate key with a memorable name. That way you can revoke access later if needed. Your test key cannot be revoked. If you think you may have shared your test key, please contact support.
By Webhook
Some platforms don't like to make HTTP requests, or don't allow you to customize how data is sent out. In these cases, the burden is placed entirely on the receiver to handle the inbound data, respond quickly, and continue. This behavior of posting to an external service is often called a webhook.
Every model you build in Summit has a special endpoint for use as a webhook. This endpoint ends in /trigger and can be found on your model's API & Webhooks screen.
Use this endpoint when a service asks you if you'd like to POST to a webhook when something occurs. For example, when a new lead comes in or when someone fills out a form.
Inside your model, you can refer to any (arbitrarily-shaped) data that is sent to your webhook endpoint by referring to the data using liquid syntax inside events like strings, text, and objects. The way to access this webhook data is like so: {{ webhook.body }}.
For example, if I might make a model in order to consume inbound leads from Typeform. In this case, the Typeform payload contains a data field called first_name, which I can access inside my model as {{ webhook.body.first_name }}.
Here's an example call to a webhook endpoint. Note: the data provided through the -d flag can be of any (arbitrary) schema.
curl -X POST "https://api.usesummit.com/beta/usesummitcom-41lgw/3c714e/db/trigger/?api_key=70b2a40ff7e902208131" \
-H "Content-Type: application/json" \
-d '{
  "event": "insert_data",
  "data": {
    "first_name": "Sam",
    "last_name": "Wilson",
    "email": "[email protected]",
    "phone_number": "555-123-4567",
    "message": "Excited to connect and learn more!"
  }
}'
By Email
Summit models can also be triggered by email. Email addresses for Summit models look like:
You can access any of the contents or meta data about the email by using the {{ webhook }} variable in your SEL.
This webhook variable will have a .body attribute that contains a dictionary of data. The following keys are available for the received email:
content_type, date, dkim_signature, from, message_id, mime_version, received, subject, to, x_envelope_from, x_gm_message_state, x_google_dkim_signature, x_google_smtp_source, x_mailgun_incoming, x_received, html, plain, message_headers, recipient, sender, signature, stripped_html, stripped_signature, stripped_text, timestamp, and token.
So to access the html contents of the email body, you would use {{ webhook.body.html }}. And to access who the sender is, you can use {{ webhook.body.sender }}.
The Two Body Problem
webhook.bodyis the root data attribute of all webhooks in Summit, which is why attributes liketokenare below it. To make matters more confusing, in the case of email, there is also a message body. Don't confuse these!
By Companion App
Live models only!
Remember, to see a model inside your Zapier or HubSpot companion app, the model must be published. You'll know if a model is published if the green toggle is turned on (near the model name while in the editor).
While most platforms require the use of these custom request actions, we do have companion apps for Zapier and HubSpot that make it even easier.
Zapier
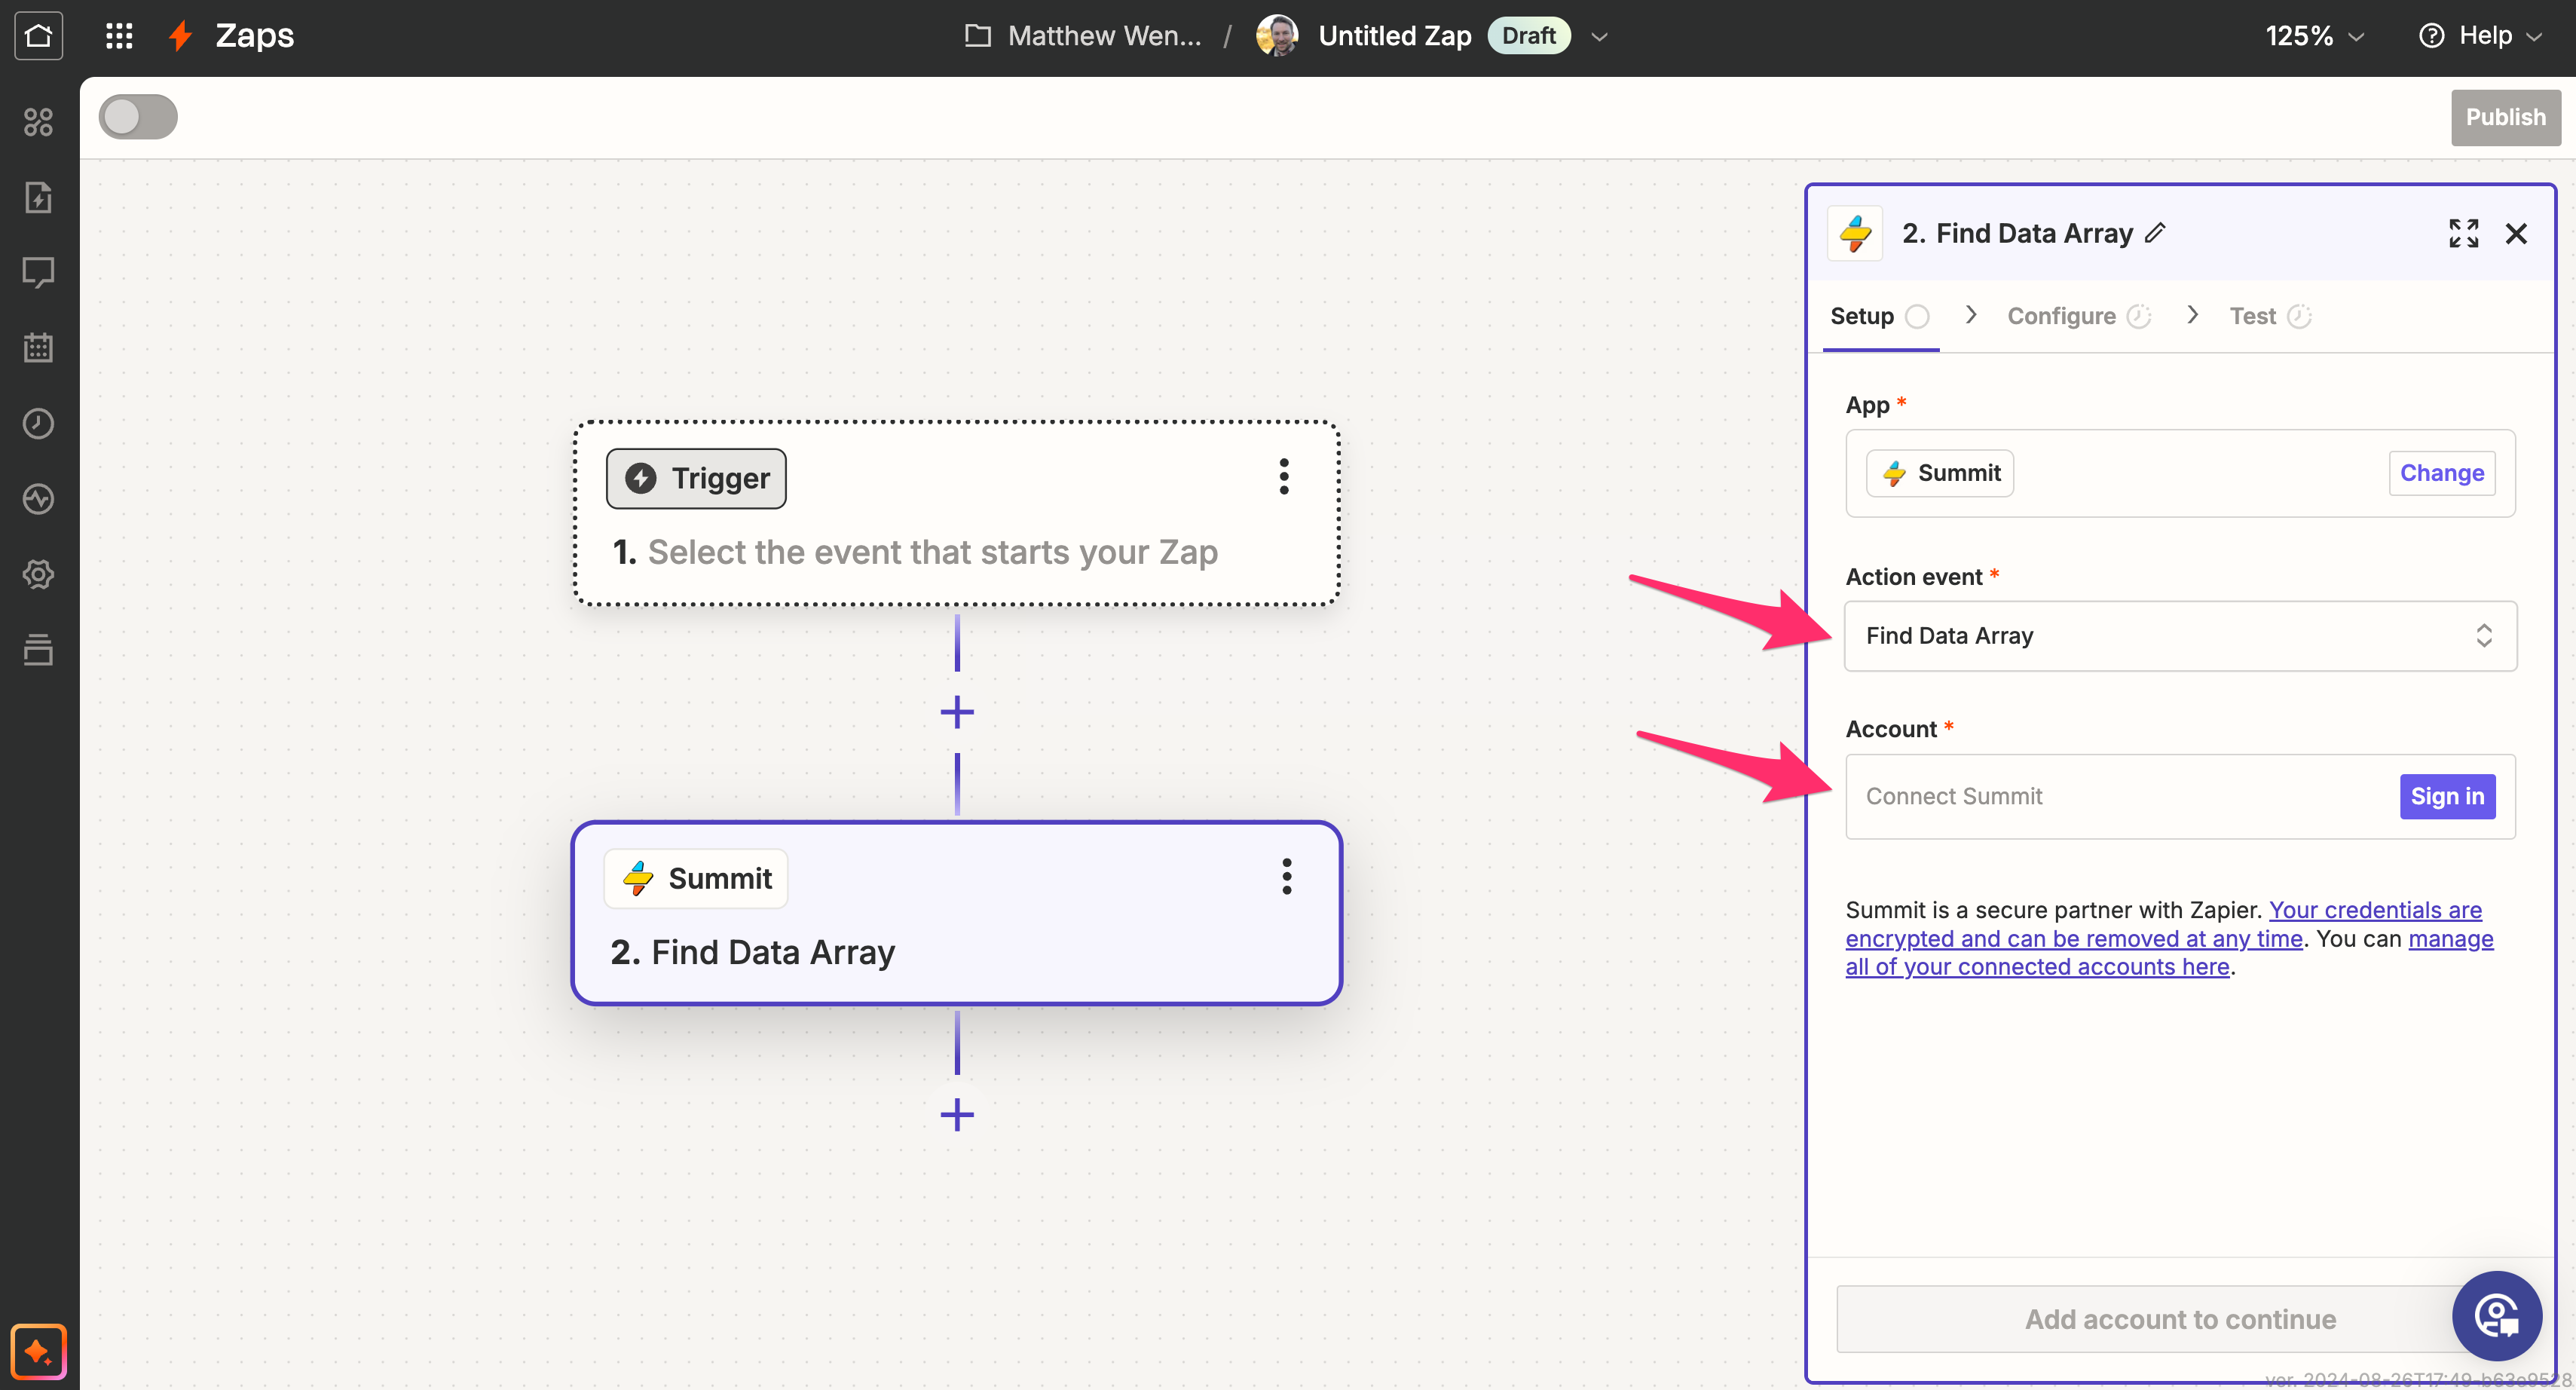
To install our Zapier app, just search for the "Summit" when adding an action to a zap. Under Action event, choose Find Data Array to pull back all of the data from your model run. Then click Account and enter your API key to connect.

Call any Summit model from a zap.
Once you choose an account, the Configure screen will allow you to select any model from your account. Once chosen, the arguments ("parameters") your model accepts will also appear as custom inputs you can populate with data from the rest of your zap.
HubSpot
To install our companion app for HubSpot, you must first authenticate to your HubSpot account from Summit from our Integrations page.
Once connected, sign in to HubSpot and visit your workflows screen by browsing the left-hand navigation: Automations -> Workflows.
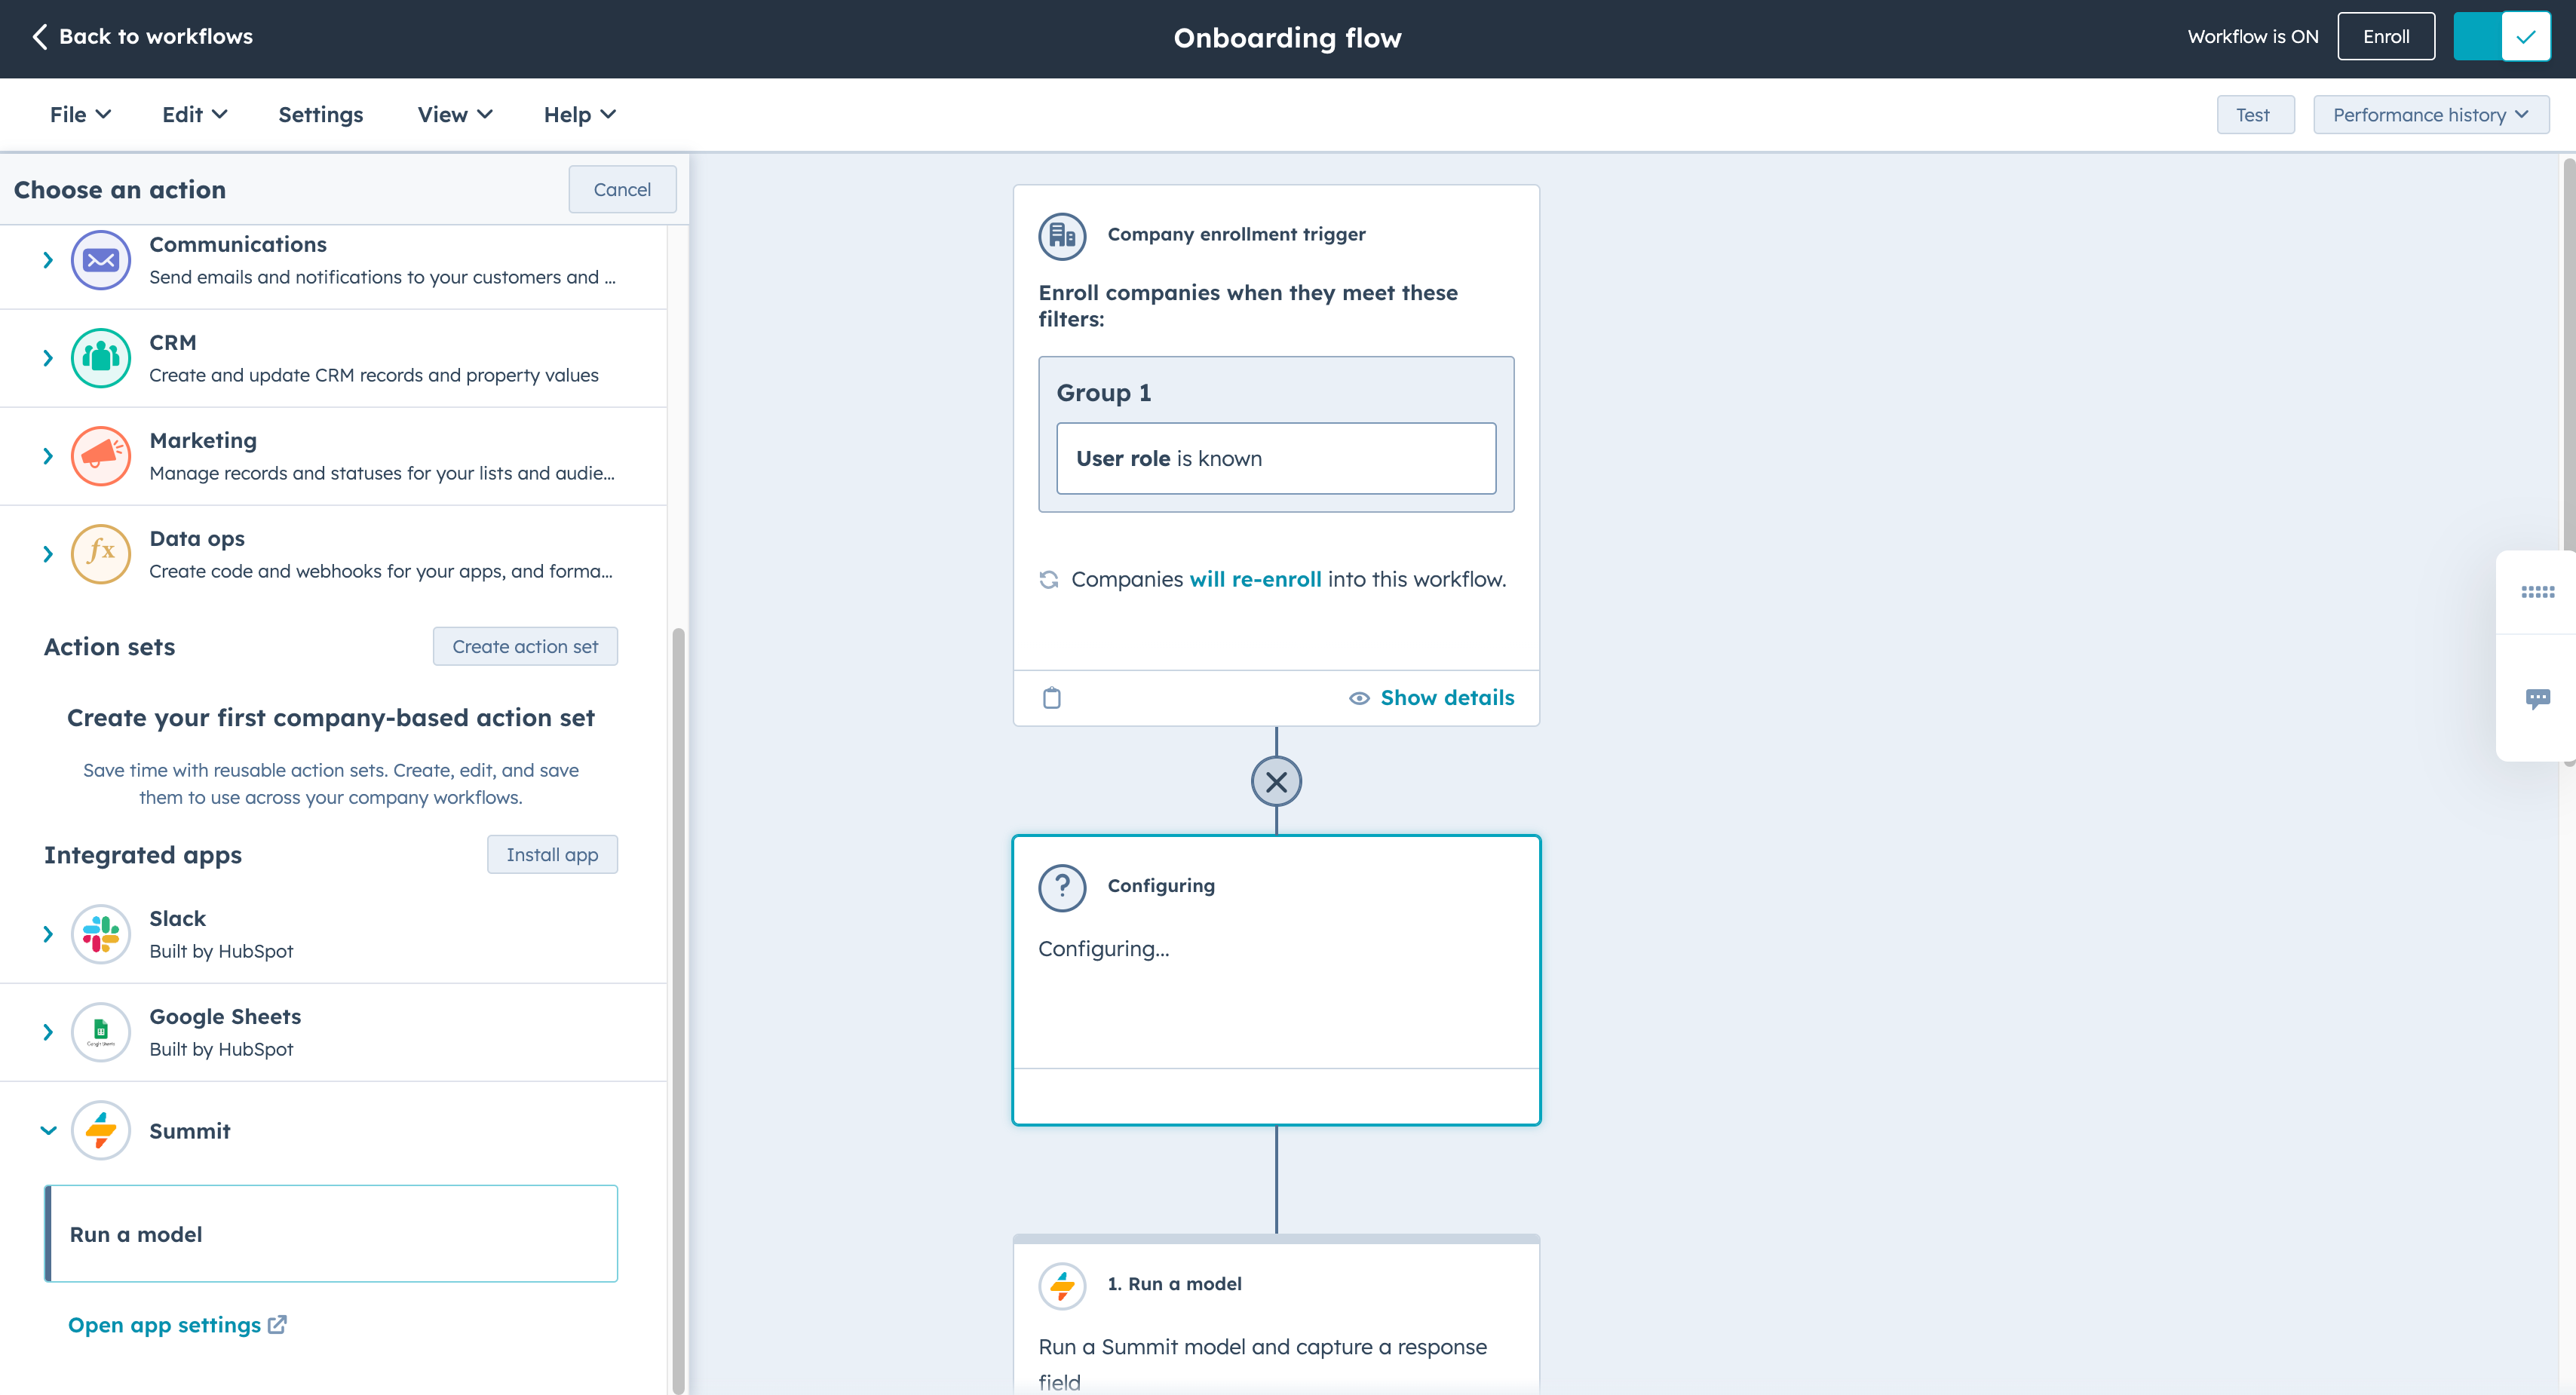
Once there, click on the [+] to add a new workflow step, then scroll down on the left-hand side. You should see Summit as an Integrated Apps option. Click to expand the option, and notice the Run a model action.

The Summit app inside HubSpot Workflows.
Choosing Run a model will exposure a new module that allows you to choose any model inside your Summit account and pass it a set of arguments (called parameters).
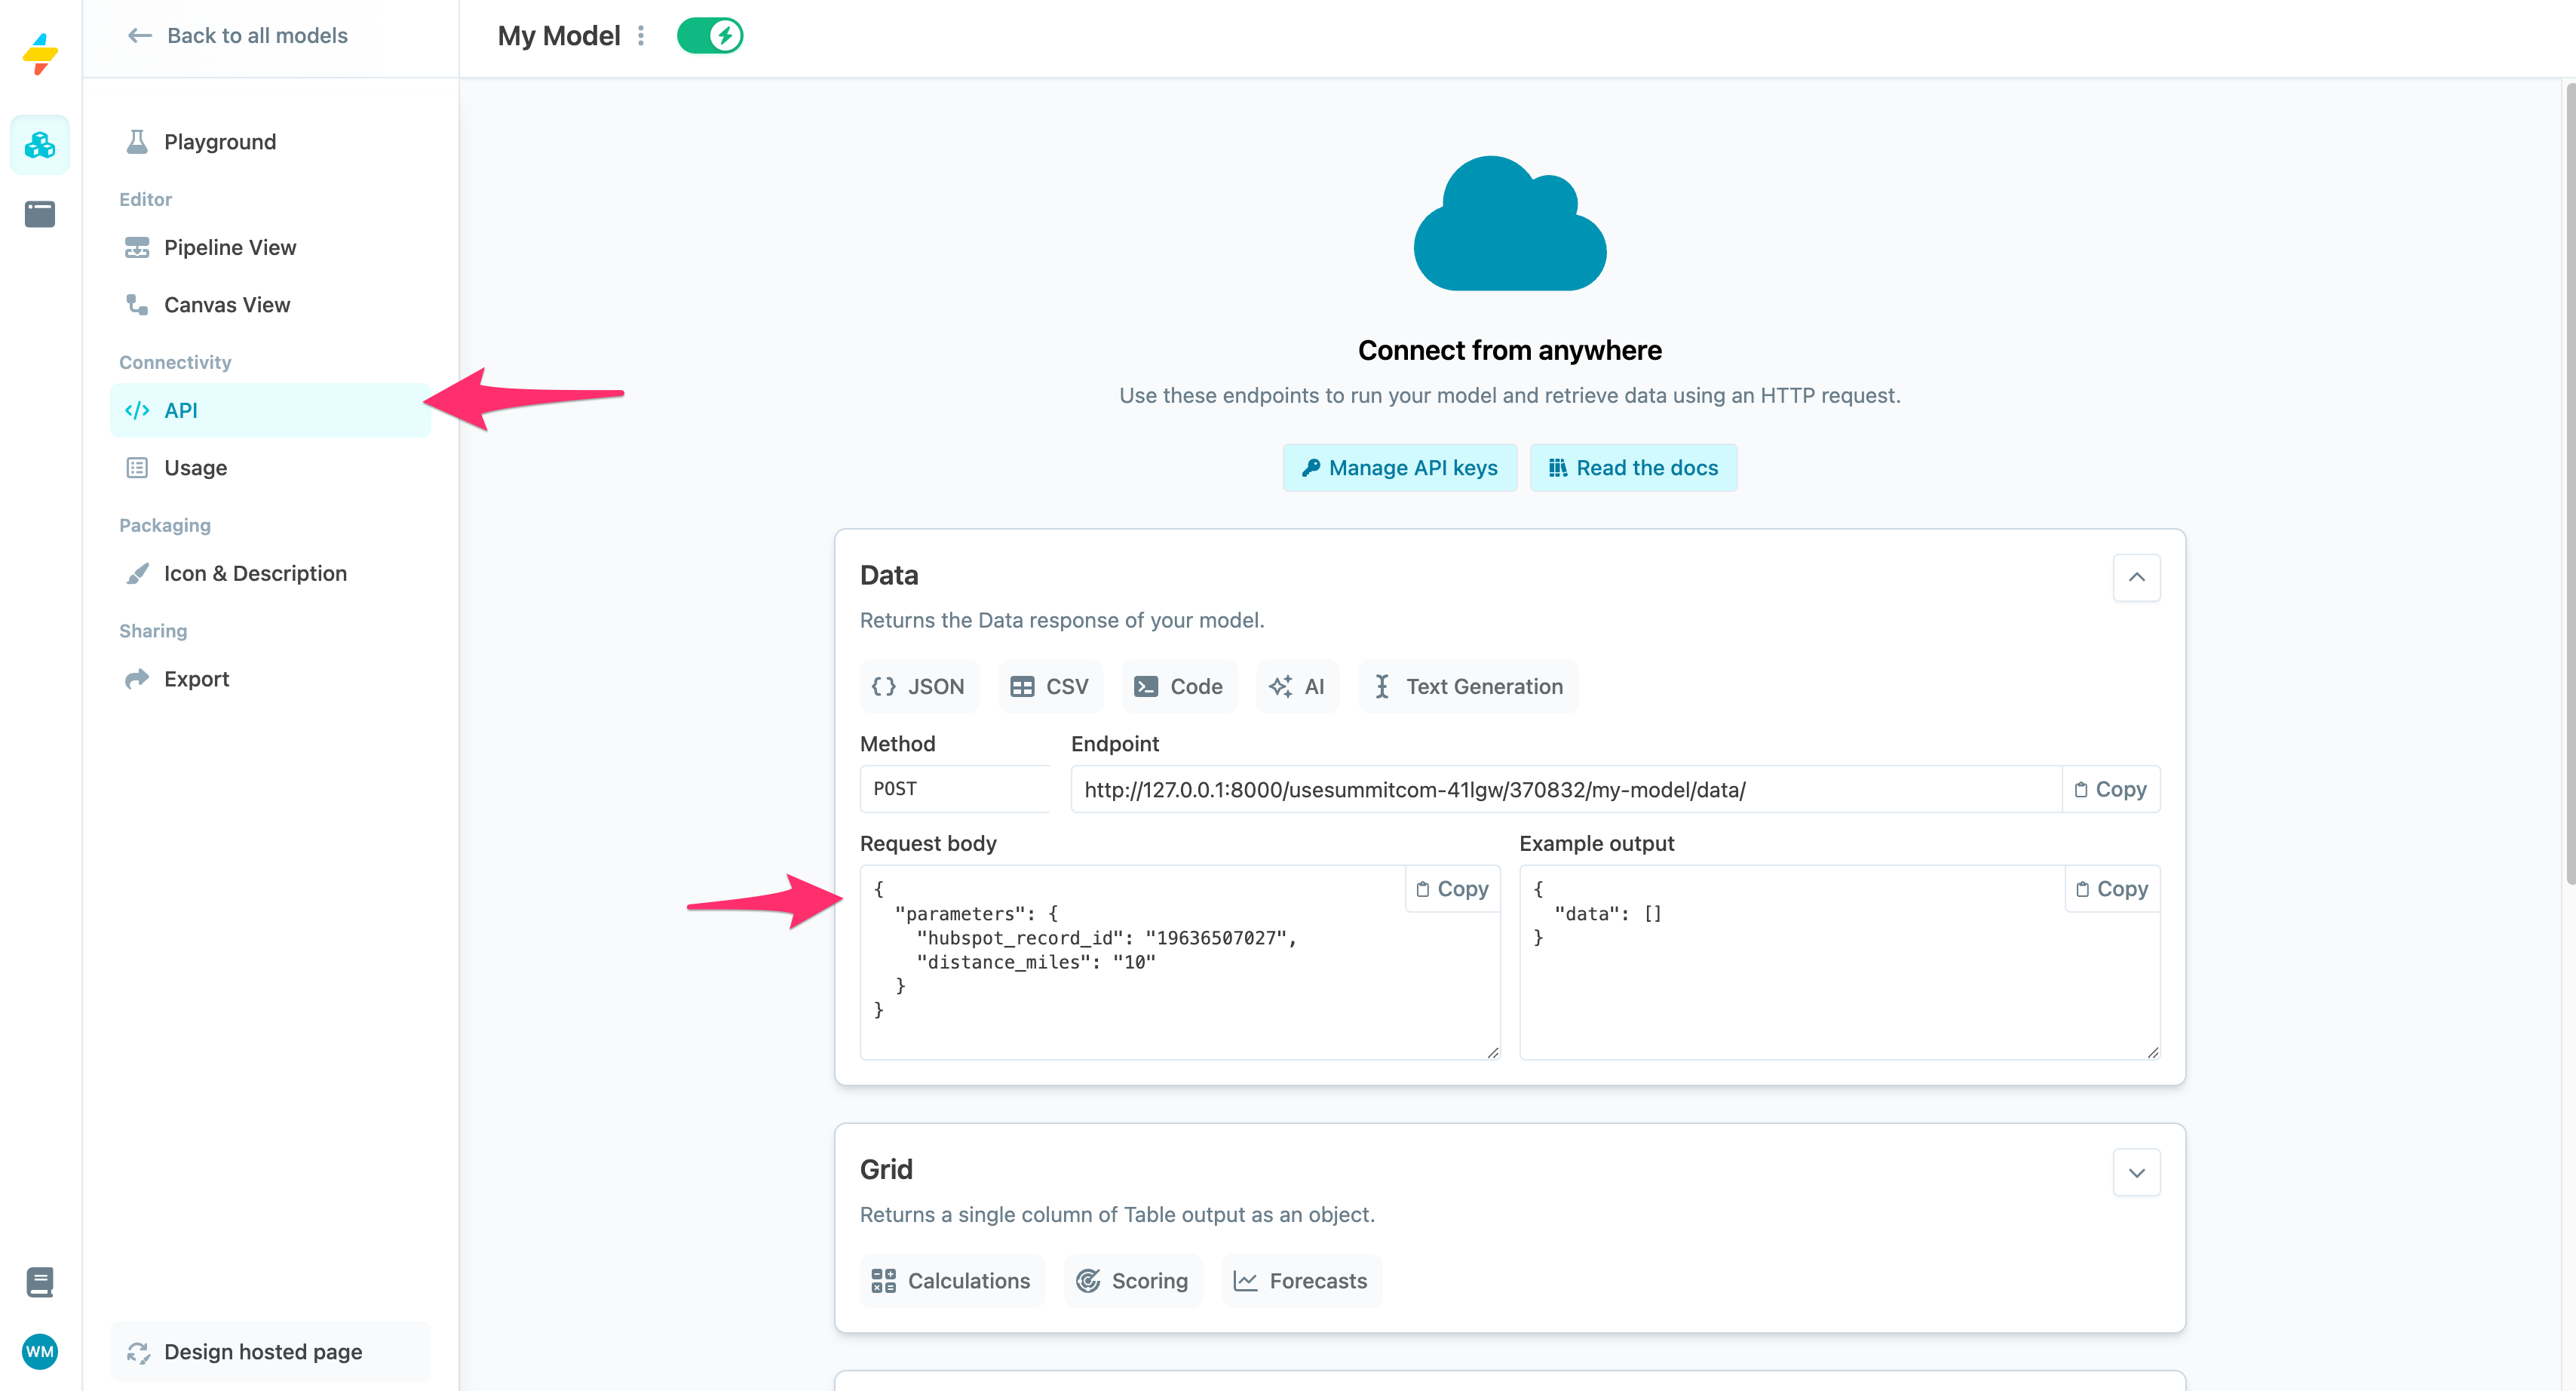
You can get this JSON block by going to your model's API screen:

The API screen for a model shows you the proper JSON payload to provide to the HubSpot step.
Click "Copy" on the button inside the Request body field. Then paste this into the Model input (JSON payload) field of your HubSpot step.
Don't just copy-paste!
The actual JSON to provide to the HubSpot app is slightly trimmed down compared to what appears in the Request body field on the API page. As you can see below, we've removed the outer
parameterskey, only providing the contents of theparameterskey instead.
{
  "hubspot_record_id": "{{ enrolled_object.record_id }}",
  "distance_miles": "20"
}
Any parameters left out of the JSON payload will use your model's defaults. For example, if we left out the distance_miles parameter, the model would fall back to its default of 10 (see screenshot).
Updated about 2 months ago
